Photo Garland DIY
This easy tutorial for making a Photo Garland is fun for the holidays or any other special occasion. Because it uses photos of your kids, it makes it a great gift idea for friends and family. But it's also a cute decoration!
Servings 1 photo garland
Cost $10
Equipment
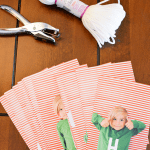
- 1 Scissors
- 1 Hole Punch
Ingredients
- 14 photos of your kids
- 3 feet string
Instructions
- Decide which method you want to use. Do you want to have photos printed or use my free Canva template that you can download here: Canva Template
- Take photos of your kids (consider buying a plain t-shirt for them to wear and posing them in front of holiday wrapping paper taped to the wall for an easy backdrop). Try to take them in natural light.
- Edit the photos. (Add some brightness or use "auto").
Method 1: Getting Photos Printed
- Use a design program to add one letter to each photo.
- Have the photos printed online or your local photo developing center. This may add a few days onto the total time to create the garland.
Method 2: Use Canva Template
- Upload edited images to Canva and drag and drop them onto the template.
- Move around the letters on the template where they look the best.
- Print out the banner on cardstock and cut out each image.
To string the banner
- Add a punched hole to each top corner.
- Lace them onto a long piece of string to create a garland.
Notes
I like to get the photos printed with a matte finish for a less DIY look.
Printing out the images on cardstock will use up a lot of your printer ink. If you plan on making a lot of these, you may want to have the photos printed to save money in the long run.
Costs will vary for this craft depending on if you already have plain shirts for the kids and how much it costs to print your images.
