How to Put Photos on Balloons
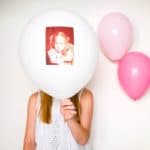
Learn how to make DIY Photo Balloons! These easy DIY decorations are perfect for a backdrop, bouquet or centerpiece for any type of party. Follow the tutorial to learn how to customize a balloon with a photo of the birthday gal or baby pics for a shower.
Servings 1 balloon
Cost $15
Equipment
- 1 Printer
- Pencil
Ingredients
- 1 Baby Photo to Scan
- 1 Tissue Paper
- 1 heavy card stock
- 1 balloon
- spray adhesive
- string
- double stick tape
Instructions
- Prepare the baby pictures. Scan them and make them in to a digital file. To make this craft efficient, try to put more than one image on a page. I was able to do that using Photoshop but Microsoft Word would work too. Smaller photos will work better and go on smoother.
- Stack sheets of tissue paper together (for however many photos you plan to print). Place a piece of card stock on top of the stack and trace roughly around the paper. Leave about an inch margin all the way around your pencil line and cut out from the full sheet of tissue paper.
- Move the rest of the tissue paper aside and work on them one at a time. Place the tissue paper, shiny side up on the table. Center one piece of card stock on top of the tissue paper. Using double-stick tape, tape around all the edges of the card stock.Fold over the excess tissue paper and stick it to the tape. Do this around all the edges.
- I placed the paper, tissue paper side down, in the paper tray of my printer (yours might be different – you may want to do a test print first!). I placed each piece of tissue paper wrapped card stock through one at a time, for each photo I printed.
- Next, cut out the photo from the tissue paper. Discard the excess tissue paper and the card stock. In a well-ventilated area (I sprayed them outside), spray the back of the tissue paper photo.
- Blow up the balloons that you'll use. The number you blow up will depend on how many photo balloons you want to make.
- Carefully smooth the photo onto the balloon. Since the balloon is round and the images are rectangular, they do not lay perfectly on the balloon and do have some wrinkles.
- Attach a string and then secure them with balloon weights or tie them to the table or another party area.
Notes
Only one image should be put on a balloon.
The larger the balloon, the better it will float.
It is best to make these balloons right before the party as balloons with decorations sometimes lose their float fairly quickly.
Lightweight string or ribbon works best.
Since I can no longer find the "MOM" balloons that I used in this post, you could DIY those with this same method. Just print out letters instead of photos. Or better yet, use colored tissue paper and simply cut out letters.
The costs of the craft will vary depending on what supplies you already have on hand.
