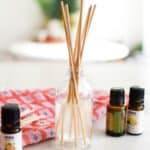
DIY Reed Diffuser
This quick DIY Reed Diffuser is an easy way to add aromatherapy to your home. With simple supplies and your favorite essential oil blend, you'll have a homemade diffuser that doesn't require any electricity.
Servings 1 diffuser
Cost $25
Ingredients
- 1 small glass jar
- 1 bundle wooden reeds
- essential oils (20-30 drops of your favorite blend)
- 1 small metal funnel
- 1 TBSP vodka (or Witch Hazel)
- 1/4 cup water
Instructions
- Add the vodka and essential oils to the glass bottle.
- Use your thumb or folded paper towels to cover the opening and shake really well.
- Use the small metal funnel to add the 1/4 cup of water to the bottle, then shake again.
- Add as many wooden reeds as will fit into the opening of the glass bottle and let them soak for 5 minutes.
- Turn the wooden reeds over in the glass bottle and place where you want to enjoy your DIY Reed Diffuser.
Notes
- You can buy ready-made reed diffusers, but I like this DIY version since it’s non-toxic and doesn’t have any other additives.
- You can embellish the bottle if this is a little too plain for you.
- Head over to my Essential Oils Pinterest Board to find inspiration and recipes for oil blends.
- Some tutorials call for a carrier oil instead of water and vodka. You can use whatever you have and prefer.
- Your nose will probably get used to the scent before any guests.
- It will take a few hours for the scent to really climb the reeds and make your room smell great.
- The stronger the oil, the stronger the smell! Use really bold scents if you want this to smell intense.
- To keep your room smelling fresh, change the reeds once a week and the oils, water and vodka at least monthly.
